
- ! For GB crochet terms please scroll down ! ( now in progress ! ) -
Am 1. Advent habe ich ein kleines neues Geschenk für Euch - die auf Instagram schon vorgestellten kleinen Lärchenzapfen als Bilder - Tutorial. Wer die großen Zapfen schon kennt und gehäkelt hat, braucht sie eigentlich nicht, sondern nur ein paar kleine Eckdaten.
Wer die Zapfen nicht kennt - es gibt dafür auch ein sehr ausführliches Bild & Text Tutorial. Bitte einfach den Link anklicken : Große Häkelzapfen
Wenn Du noch keine Zapfen gehäkelt hast, aber im Häkeln versiert bist wird die Anleitung wohl ganz gut funktionieren. Für Anfänger empfehle ich das Zapfenhäkeln nicht, aber ein Versuch ist es allemal wert, denn ob es für Dich zu kompliziert ist kannst Du am Besten einschätzen.
Kurzversion
Die kleinen Zapfen bestehen aus 4 Reihen mit je 3 Zapfenblättchen.
Kurzanleitung:
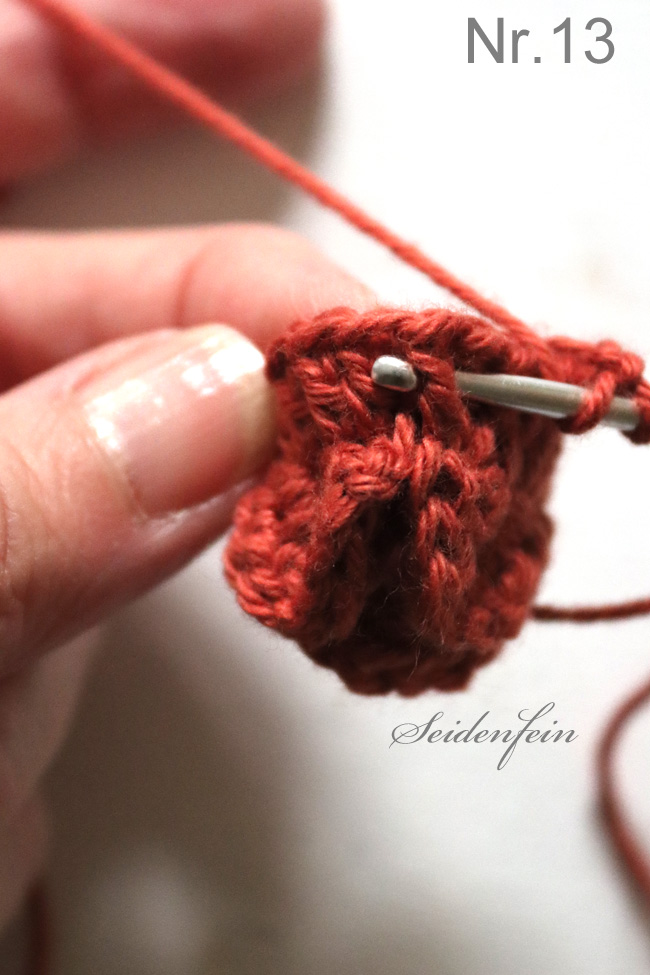
1 MR mit 2 Luftmaschen, 9 Stäbchen, 1 Kettmasche. Den Maschenring zuziehen. Die 9 Stäbchen werden wie folgt behäkelt:
2 Luftmaschen. UM das nächste Stäbchen ( also dem ganzen Stäbchen ) werden von oben nach unten 3 Stäbchen gehäkelt. 1 Luftmasche häkeln. Nun 3 Stäbchen von unten nach oben häkeln. Das entstandene Zapfenblättchen mit 1 Kettmasche über dem nächsten Stäbchen befestigen.
Danach folgen 2 Luftmaschen, 2 Stäbchen in die rechte Seite des Zapfenblättchens, 1 Stäbchen in die Mitte, 2 Stäbchen in die linke Seite des Zapfenblättchens, 1 Stäbchen zwischen die Zapfenblättchen. Die Runde mit einer Kettmasche schließen.
In der Folgerunde müssen die Zapfenblättchen versetzt begonnen werden. Dazu entweder mit Kettmaschen bis zur Mitte des Zapfenblättchens der Vorrunde häkeln oder 3 Luftmaschen häkeln und mit 1 Kettmasche in der Mitte des Zapfenblättchens befestigen und dort mit den Häkelblättchen beginnen.
Nach 4 Reihen den Zapfen ausstopfen. Nun in jedes Zapfenblättchen 5 Stäbchen häkeln - aber immer die letzte Masche der Stäbchen auf der Nadel lassen. Dann alle 5 Schlaufen zusammen abmaschen. 1 Stäbchen häkeln, die nächsten Zapfenblättchen genauso abmaschen. Runde mit 1 Kettmasche schließen. 5 Luftmaschen häkeln und mit 1 Kettmasche auf der gegenüberliegenden Seite befestigen.
Ausführlicher ist es hier:
Tutorial Lärchenzapfen
Anfang / 1. Runde
Einen Maschenring legen und 2 Luftmaschen häkeln ( sie ersetzen 1 Stäbchen )
In den Maschenring (MR) werden nun 9 Stäbchen gehäkelt und die Runde mit 1 Kettmasche geschlossen


Den Anfangsfaden nehmen und den Maschenring damit zu ziehen. Rückseitig mit dem Häkelfaden verknoten, damit sich der Maschenring nicht aufzieht ( bei Baumwollgarn )
Um den Maschenring hat sich also ein Ring aus 10 Maschen gebildet, die wie Radspeichen um die Mitte angeordnet sind. Diese Maschen sie sind die Grundlage für die Zapfenblättchen.


Die Zapfenblättchen häkeln / 2.Runde
Die Blättchen werden nun um die Stäbchen gehäkelt - also nicht oben das Ende der Masche wie sonst, sondern um den Maschenkörper, der unten im Maschenring befestigt ist und von mir als "Speiche" bezeichnet wird.
Das Prinzip zeige ich hier auf einem Instagram - Video das ich für die größeren Zapfen aufgenommen habe. Zum Ansehen auf das Bild klicken , dann werdet Ihr zum Video weitergeleitet

Als Häkelschrift gibt es diese Blättchen auch:
Pro Zapfenblättchen werden 2 dieser Stäbchen bzw "Speichen" benötigt. Das rechte Stäbchen (rot) für die rechte Seite des Blättchens, das linke Stäbchen (grün) für die linke Seite des Blättchens
Aus zeichnerischen Gründen habe ich alles in Form einer Linie dargestellt

Das Zapfenblättchen

Begonnen wird mit 2 Luftmaschen, dann werden die nächsten beiden Stäbchen behäkelt:
UM das 1.Stäbchen werden von oben (Außenrand des Kreises) nach unten (Kreismitte) 3 Stäbchen gehäkelt.


Jetzt kommt die Stelle, an denen einige scheitern - links neben dem Stäbchen das eben behäkelt wurde, liegt das Stäbchen, das wir für die linke Seite des Zapfenblättchens brauchen. Hier wird nun von der Mitte in Richtung Rand um das Stäbchen gehäkelt - wieder mit 3 Stäbchen. Das Ende des Blättchens wird mit 1 Kettmasche über dem nächsten Stäbchen befestigt.
Alles noch 2x wiederholen, mit 1 Kettmasche schließen.


Danach folgen 2 Luftmaschen, 2 Stäbchen in die rechte Seite des Zapfenblättchens, 1 Stäbchen in die Mitte, 2 Stäbchen in die linke Seite des Zapfenblättchens, 1 Stäbchen zwischen die Zapfenblättchen. Die Runde mit einer Kettmasche schließen.


Das ganze wieder 2x wiederholen und mit einer Kettmasche enden.
Diese Runden aus Stäbchen und umhäkelten Stäbchen werden 4x gearbeitet, damit 4 Reihen aus Lärchenblättchen entstehen.


fertig !
Liebe Grüße Eure Eva !
--------------------------------------------------------------------------------------------------------------------------------
crochet Tutorial
GB terms
-------------------------------------------------------------
on the first Advent I have a small new gift for you - the already presented on Instagram small larch cones as pictures - tutorial. Who already knows the large pine cones and crocheted, it actually does not need, but only a few small key data.
Who does not know the cones - there is also a very detailed picture & text tutorial for it. Please just click on the link : Large crochet cones
If you haven't crocheted any cones yet, but are skilled in crochet the tutorial will probably work quite well. I don't recommend it for beginners, but it's worth a try, because you can judge best if it's too complicated for you.
Short version
The small cones consist of 4 rows with 3 cone leaves each.
Short instructions:
1 magic ring with 2 chain , 9 treble crochet, 1 sl st. Pull thread and it draws together to form a circle . Crochet the 9 treble crochets as follows:
2 chains. Crochet 3 trebel crochets from the top to the bottom around the body of the treble crochet (i.e. the whole treble crochet). Crochet 1 chain. Now crochet 3 treble crochets from the bottom to the top. Attach the resulting larch cone leaf with 1 slip stitch over the next treble crochet.
Then follow with 2 chains, 2 treble crochets in the right side of the larch leaf, 1 treble crochet in the middle, 2 treble crochets in the left side of the larch leaf, 1 treble crochet between the larch leaves. Close the round with a slip stitch.
In the following round, the larch leaves must be started staggered. To do this, either crochet with slip stitches to the center of the next larch leaf of the previous round or crochet 3 chains and fasten off with 1 chain stitch in the center of the larch leaf and start crocheting leaves there.
After 4 rows, stuff the little larch cone with darning cotton or something similar. Now crochet 5 treble crochets in each larch leaf - but always leave the last stitch of the stitches on the needle. Then crochet all 5 loops together. Crochet another treble crochet, then crochet the next larch leaves in the same way.
Close round with 1 slip stitch. Crochet 5 chains and fasten with 1 slip stitch on the opposite side.
It is more detailed here:
Tutorial larch cone
Beginning / 1st round
Make a magic ring and crochet 2 chains (they replace 1 treble crochet).
Crochet 9 treble crochets into the ring and close the round with 1 slip stitch.
(1.row)
Take the starting thread and close the magic ring. Knot the back of the crochet thread to prevent the ring from unraveling (with cotton yarn).
So around the magic ring has formed a ring of 10 stitches, which are arranged around the center like spokes of a wheel. These stitches they are the basis for the larch leaves.

Crochet the larch cone leaves / 2nd round
The larch leaves are now crocheted around the treble crochets - that is, not at the top of the end of the stitch as usual, but around the body of the stitch, which is attached to the bottom of the stitch ring and is called "spoke" by me.
The principle I show here on an Instagram - video I took for the larger pine cones. To view click on the image , then you will be redirected to the video
As a crochet font, these larch cone leaves are also available:
For each larch leaf, 2 of these sticks or "spokes" are needed. The right treble crochet (red) for the right side of the leaf, the left treble crochet (green) for the left side of the leaf.
For drawing reasons I have shown everything in the form of a line
1.Runde = first row / 2.Runde = second row
The cone leaf
Start with 2 chains, then crochet the next two stitches:
To the 1 treble crochet 3 treble crochets from the top (outer edge of the circle) to the bottom (center of the circle).
now 1 turning chain
Now comes the place where some fail : to the left of the treble chain that was just crocheted, lies the treble chain that we need for the left side of the larch leaf.
Here we crochet from the center towards the edge around the treble chain - again with 3 treble chains. The end of the leaf is attached with 1 slip stitch over the next treble chain.
Repeat everything 2x more, close with 1 slip stitch.

Then follow with 2 chains, 2 treble crochets in the right side of the larch leaf, 1 treble crochet in the middle, 2 treble crochets in the left side of the larch leaf, 1 treble crochet between the lrch cone leaves. Close the round with a slip stitch.
In the following round the larch leaves must be started staggered. To do this, either crochet with slip stitches to the center/middle of the larch leaf of the previous round, or crochet 3 chains and fasten off with 1 slip stitch in the center of the larch leaf and start crocheting leaves there.
Repeat the whole thing again 2x and close the round with a slip stitch.
These rounds of treble crochets and crochet around treble crochets have to be worked 4 times to make 4 rows of larch leaves.
The larch cone can now be filled with stuffing wool or similar.
Close the larch cone
Crochet 2 chains, crochet 5 treble crochets in the larch leaf - but always leave the last stitch of these treble crochets on the needle. Then crochet all 5 loops together. Crochet 1 slip stitch, cast off the next larch leaf in the same way. Close round with 1 slip stitch.
Crochet 5 chains and fasten with 1 slip stitch on the opposite side.
great ! You have done it !
Best regards Yours
Eva